How to Install ERPNext on Ubuntu
Install Frappe ERPNext manually on Ubuntu using Python, Nodejs, Redis, MariaDB and Bench.
Frappe ERPNext is one of the most popular, free and open source ERP system. Frappe ERPNext is a cloud based integrated Enterprise Resource Planning software that supports manufacturing, distribution, retail, trading, services, education, non profits, healthcare and more.
For ERPNext on MacOS, visit other article on how to install ERPNext on MacOS.
In this guide, we’ll learn how to set up Frappe ERPNext on Ubuntu, install required dependencies, configure the database configurations and install frappe-bench CLI tool to manage multiple sites and apps based on Frappe Framework.
Officially Frappe only supports two operating systems: Ubuntu and MacOS.
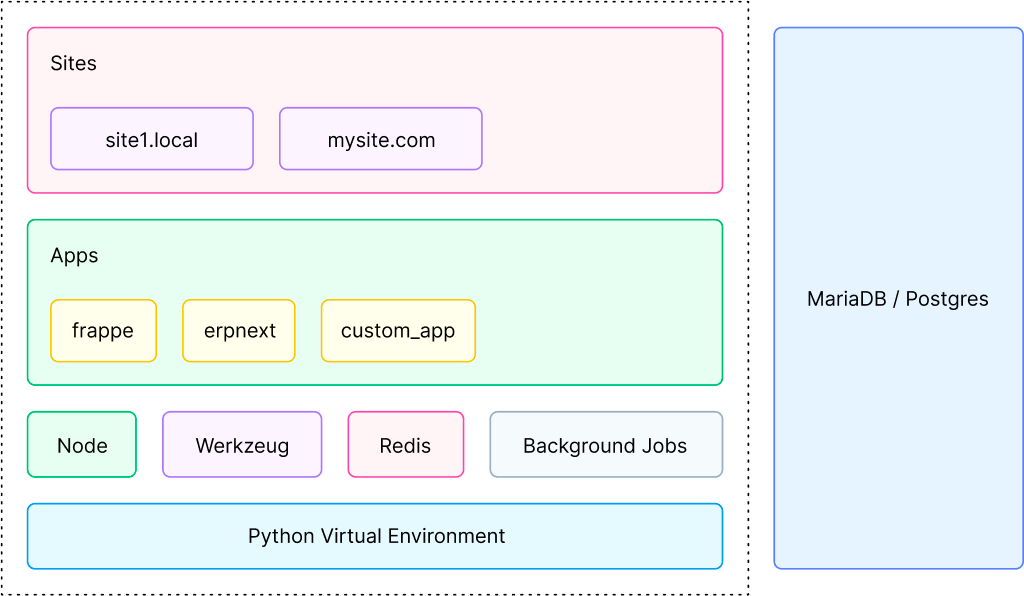
Frappe Architecture
Here's a step-by-step guide to install ERPNext on Ubuntu:
Requirements:
- Ubuntu Desktop: Ensure you have a clean installation of Ubuntu Desktop. The LTS (Long Term Support) versions are recommended.
- User with
sudoprivileges: You should have a user with sudo privileges. If you are already using the root user, you can skip thesudocommand in the following steps. - Update System Packages using:
sudo apt update && sudo apt upgrade
Step 1: Install Python and dependencies
Ensure that you have Python installed on your system. If not, install it by running the following command in your terminal:
sudo apt install python3-minimal build-essential python3-setuptools
Step 2: Install Node.js and Yarn
sudo apt install nodejs
sudo apt install npm
sudo npm install -g yarn
Step 3: Install wkhtmltopdf
ERPNext uses wkhtmltopdf for PDF generation. Install it by following the instructions on the wkhtmltopdf downloads page.
sudo apt install -y wkhtmltopdf
Step 4: Install Redis and MariaDB
ERPNext uses Redis for caching and MariaDB as the database.
sudo apt install -y redis-server mariadb-server
Step 5: Configure MariaDB
Set up a password for the MariaDB root user:
sudo mysql_secure_installation
Step 6: Create a Frappe User
Create a non-root user for running Frappe applications:
sudo adduser frappe
sudo usermod -aG sudo frappe
Step 7: Clone ERPNext Repository
Clone the ERPNext repository from GitHub:
git clone https://github.com/frappe/bench bench-repo
Step 8: Install ERPNext Bench:
Bench is a command-line tool used to manage multiple Frappe/ERPNext instances.
sudo pip3 install -e bench-repo
Step 9: Create a new Bench
bench init frappe-bench --frappe-branch version-14
cd frappe-bench
Step 10: Install ERPNext using Bench:
Install ERPNext using the following command:
bench new-site site1.local
bench --site site1.local install-app erpnext
Follow the prompts to set up the administrator password and other configurations.
Step 11: Start ERPNext using Bench:
Finally, start bench to run ERPNext.
The bench start command runs the development server. For production, you'll need to set up a production-ready server using Nginx or another web server .
bench start
ERPNext should now be accessible in your browser at:
http://localhost:8000Congratulations! You have successfully installed ERPNext on Ubuntu.
Login to ERPNext
Use the default username Administrator and the password you set during the installation.
Install Supervisor (Optional)
Supervisor can be used to manage ERPNext processes. Install it and configure it by following the official instructions by Supervisor.
You may need to refer to the official documentation of ERPNext for any additional or updated steps. The installation process might change with newer releases. Always check the ERPNext GitHub repository or ERPNext documentation for the most accurate and up-to-date instructions.
For production setup of ERPNext, you would need to follow a different approach with proper server configuration and security considerations.
I edit and update this article timely for corrections and improvements. Thank you for reading. Subscribe for more :)