How to Install ERPNext on MacOS
Install Frappe ERPNext manually on a MacOS using Homebrew, Nodejs, Pip and Bench CLI.
Frappe ERPNext is one of the most popular, free and open source ERP system. Frappe ERPNext is a cloud based integrated Enterprise Resource Planning software that supports manufacturing, distribution, retail, trading, services, education, non profits, healthcare and more.
For ERPNext on Ubuntu, visit other article on how to install ERPNext on Ubuntu.
In this guide, we’ll learn how to set up Frappe ERPNext on MacOS, install required dependencies, configure the database configurations and install frappe-bench CLI tool to manage multiple sites and apps based on Frappe Framework.
Installing ERPNext on macOS can be a bit different to other operating systems, as it requires setting up a virtual environment to run ERPNext. Frappe framework is a full-stack web based framework based on Python, so it uses the virtual environment to setup isolated environments for multiple Python versions.
Officially Frappe only supports two OS: MacOS and Debian/ Ubuntu.
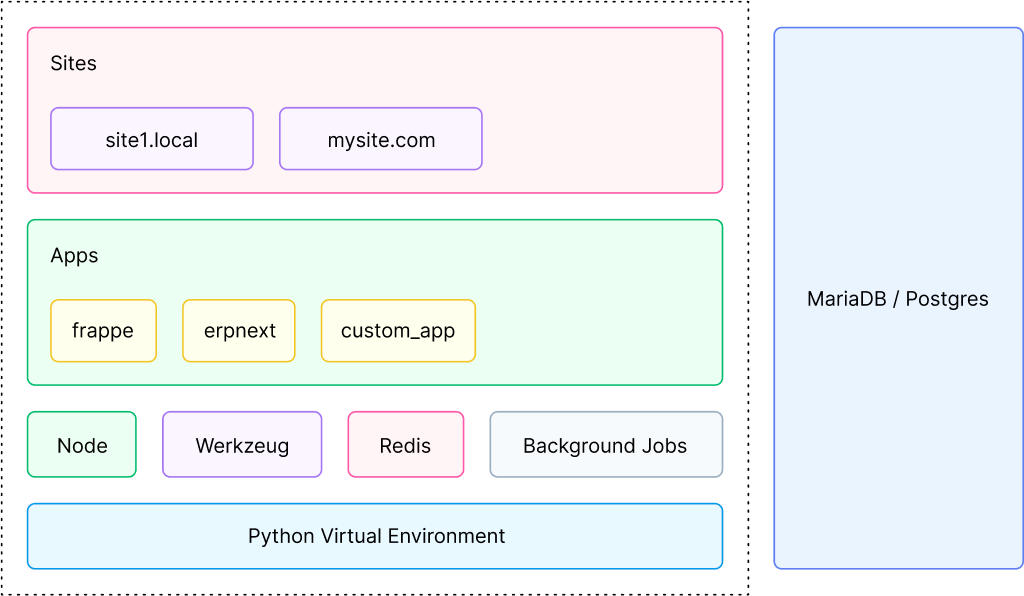
Frappe Architecture
Here's a step-by-step guide to help you install ERPNext on macOS:
Requirements:
- a macOS device
- pre-installed command line version of Xcode tools
You can install Xcode tools by using this command in your macOS terminal:
xcode-select --installor using "Software Update" in the system settings.
Step 1 - Install Homebrew
Ensure that you have Homebrew (https://brew.sh/) installed on your macOS. You can check it by using brew -v in your terminal.
If brew is not installed, you can install it in two ways:
- paste and run the following command in your terminal:
/bin/bash -c "$(curl -fsSL https://raw.githubusercontent.com/Homebrew/install/HEAD/install.sh)"
2. download the .pkg installer directly from Homebrew's latest Github releases.
This is not a mandatory step but it will make our life easier and other installations much easier.
Step 2 - Install Python, MariaDB, Redis
Next, we will install Python, MariaDB, and Redis using brew that we just installed. Open Terminal and run the following commands one by one:
brew install python@3.9 mariadb@10.3 redis@5.0You could choose to install specific versions like above or just use plain commands to install latest updates like below:
brew install python
brew install mariadb
brew install redis
After installation, check their info using:
brew info redis
brew info mariadb
To start mariadb and redis services using:
brew services start mariadb
brew services start redis
Step 3 - Install Node.js
ERPNext requires Node.js. Here are 3 ways to install Node.js in macOS:
1. using Homebrew
brew install node2. using NVM - node version manager
Using NVM step requires installing NVM first and then use NVM to install Node.js. A lengthier process but very much useful in long run. With NVM, you can install, switch and control multiple versions of Node.js easily using simple nvm commands.
curl -o- https://raw.githubusercontent.com/nvm-sh/nvm/v0.39.7/install.sh | bashnvm install nodeUsing nvm feels better because it makes nodejs easier.
3. Download the .pkg installer package for macOS directly from https://nodejs.org/.
Step 4 - Install wkhtmltopdf
ERPNext needs wkhtmltopdf to generate PDFs. You can use Homebrew to install wkhtmltopdf by using:
brew install --cask wkhtmltopdfOr you can also visit the official site at https://wkhtmltopdf.org/downloads.html and select the macOS installer. Once downloaded, double-click on the installer to install it.
Step 5 - Edit MariaDB Configuration File
Use any text editor of your choice like nano or vim to edit my.cnf in your terminal like:
nano /usr/local/etc/my.cnfFor Apple Silicon M1 or M2 laptops, the file can be found in:
nano /opt/homebrew/etc/my.cnfUse this configuration and save it in your my.cnf.
[mysqld]
character-set-client-handshake = FALSE
character-set-server = utf8mb4
collation-server = utf8mb4_unicode_ci
bind-address = 127.0.0.1

[mysql]
default-character-set = utf8mb4
Once the config are saved, restart your MariaDB services by using brew:
brew services restart mariadb Step 6 - Install Bench using Pip
Now you're ready to install ERPNext itself. Open Terminal and create a new folder where you want to store the ERPNext files using:
mkdir erpnext
cd erpnext
Next, create a Python virtual environment and activate it:
python3 -m venv env
source env/bin/activate
Now, install Bench using pip3 (pre-installed with Python >3.4) :
pip3 install frappe-benchVerify the bench installation using:
bench --versionInitialize a new bench instance to latest version as of this writing:
bench init frappe-bench --frappe-branch version-14Create a new Frappe site erpnext.local inside folder frappe-bench using:
cd frappe-benchbench new-site erpnext.localStep 7 - Configure ERPNext:
Edit the site_config.json file to set up the database settings:
nano sites/erpnext.local/site_config.jsonIn the editor, add the following lines (you can use any password of your choice):
"db_name": "erpnext",
"db_password": "your_db_password"
Save and close the file (Ctrl + X, then Y, and Enter).
Step 8 - Setup ERPNext using bench:
Now, we will install Frappe app erpnext in our Frappe site erpnext.local using bench. To do that, first we download the app from a remote git repo using:
bench get-app erpnext https://github.com/frappe/erpnextThen, install the downloaded Frappe app erpnext into a specific Frappe site erpnext.local that we created earlier using:
bench --site erpnext.local install-app erpnextYou can read more about the basic usage of bench here.
Step 9 - Run ERPNext:
Finally, start the development server to run ERPNext:
bench startYou should be able to access the Frappe ERPNext application by opening a web browser and navigating to the following URL:
http://localhost:8000Congratulations! You have successfully installed ERPNext on macOS.
Login to ERPNext
Use the default username Administrator and the password you set during the installation.
For production setup of ERPNext, you would need to follow a different approach with proper server configuration and security considerations. The installation process might change with newer releases. Always check the ERPNext GitHub repository or ERPNext documentation for the most accurate and up-to-date instructions.
I edit and update this article timely for corrections and improvements. Thank you for reading. Subscribe for more :)